Debugging container applications can be frustrating. Last week a few of us got together to hack on Atomicapp and the Nulecule specification. The codebase was moving fast, so I hit a few bugs. The problem was the application I was running was in a container and the bug was difficult to reproduce on my local workstation. The python traceback output suggested it was a simple fix so I wanted to just edit the code in place in the container and keep moving. But then how would I get the code onto my local development box and into my git repository? And how could I test this code change?
My approach was to bindmount the source from the local workstation into the container so the files being edited can remain in the local git repository.
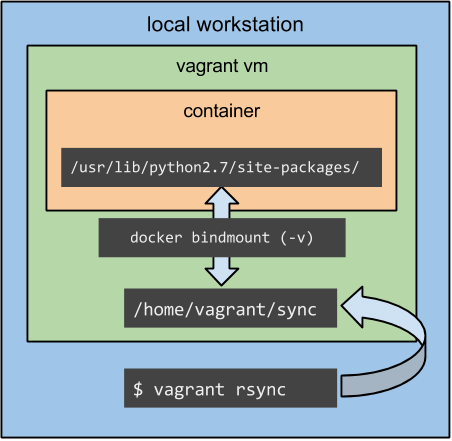
Setup
I’m running a vagrant box that rsync’s content from the current directory into /home/vagrant/sync. The container image projectatomic/atomicapp:dev is run in the vagrant VM. The challenge is to bindmount the sync directory into the container to overwrite the container code with my local development git repository.
Procedure
Clone your fork of the source code repository.
git clone https://github.com/projectatomic/atomicapp.gitCreate a simple Vagrantfile that will rsync the current working directory. The default Vagrantfile should do.
Start the vagrant box
vagrant upSSH to the vagrant VM
vagrant sshNow you’re in the vagrant VM. Pull the buggy container image
docker pull projectatomic/atomicapp:devWe need to know how to run the image. Inspect the RUN LABEL using the atomic CLI
$ atomic info projectatomic/atomicapp:dev
RUN          : docker run -it --rm --privileged --net=host -v `pwd`:/atomicapp -v /run:/run -v /:/host --name NAME -e NAME=NAME -e IMAGE=IMAGE IMAGE -v run /atomicapp
INSTALL      : docker run --rm -it --privileged -v /run:/run -v `pwd`:/atomicapp -e IMAGE=IMAGE -e NAME=NAME --name NAME IMAGE -v install --destination /atomicapp /application-entity
Copy the RUN line and add a bindmount of the rsync directory to the installed directory of the container. Since this is a python application this is in
/usr/lib/python2.7/site-packages/. We’ll also need to change theENTRYPOINTof the container to bash so we can do interactive development.$ docker run -it --rm --privileged --net=host \ -v /home/vagrant/sync/atomicapp:/usr/lib/python2.7/site-packages/atomicapp-0.1-py2.7.egg/atomicapp \ --entrypoint bash -v /run:/run -v /:/host \ --name atomicapp -e NAME=atomicapp -e IMAGE=projectatomic/atomicapp:dev \ projectatomic/atomicapp:devNow you’re in the container bash shell. Run the application to reproduce the bug.
In another terminal window on your local workstation, edit the source code to add some debugging statements and save.
From the local workstation rsync the repo changes you just made.
vagrant rsyncBack in the other window running the container bash shell you should now see the changes you just made. Try running the application again.
Repeat steps 8-10 as your development workflow. When you have fixed the bug, commit the changes, push and submit a pull request.
This example uses Python, an interpreted language, but a similar approach should work with compiled languages such as Go. If you’re not running in a Vagrant environment the steps are fewer but I included them here so you might benefit from seeing the rsync workflow.
Working with containers means learning new ways of debugging. I hope this post helps broaden your vision of how this can be done while still retaining efficient workflows under version control.